
Showing posts with label front basting. Show all posts
Showing posts with label front basting. Show all posts
Thursday, December 23, 2010
Where to start?
I've found a background fabric and I'm ready to get started. I want to try Liza's front basting method and I want to start with an easy block. I'm going to be doing Kim's Roseville Album; which block would be the best one? Mind you, I'm kinda chicken here. ;)
Sunday, November 21, 2010
Front Basting?....I'm Hooked!
Not entirely what applique planet I have been living on, I had never heard of back basting let alone front basting!! When Liza posted about her front basting method here, and then Gay posted a link showing Liza actually stitching this method here, I just had to give it a go for myself. Not one to shrink from a challenge I thought I would try it out on my second coral tree!!!
Up until now I had always been a freezer paper, finger press and pin girl. I had already cut out the freezer paper for this tree and drawn around the freezer paper for the outline. I'm not sure how Liza draws her outline onto her fabric, but next time I will put the pattern over my lightbox, then place the fabric over that, then draw around the outline, thus skipping the freezer paper altogether. (Any hints Liza?)
Once the outline is drawn, pin the shape to the background fabric (I didn't need many pins to hold it in place)...
 (Once again with this complicated coral tree shape I am only cutting around the fabric as I get to it, to help avoid very frayed edges. With most shapes I would simply cut around the entire shape in one go, then pin and stitch it onto the background.)
Once the shape was pinned to the background, I used my freemotion (darning) foot to stitch over the drawn line. The one thing you have to be careful about with the freemotion method is that your stitches don't become too small or they will be very hard to unpick!!!
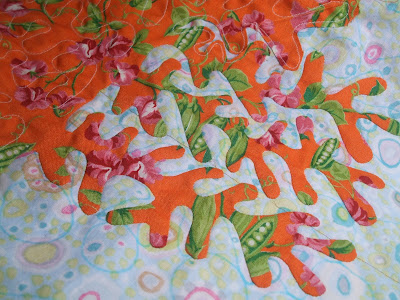
 Here is the coral tree front basted (outline stitched) and ready to be appliqued....
 To begin appliqueing simply unpick a few outline stitches...as Liza explained the fabric now has a memory of where the outline stitch was, so when you turn the edge under with your needle the fabric turns under very naturally and easily. If you click on these photo's they will enlarge to see closer detail.
 Once you have appliqued around to the next lot of outline stitches, simply unpick a few more and continue with the needleturn applique. I found as I unpicked the outline stitches that it really helped to pull the thread left hanging loose on the back (bobbin thread) through to the front and cut off both the outline stitch threads. This avoids having the back thread getting tangled up in your applique stitches.
 And that is it! I truly hope I haven't confused you further, I am not the best at explaining details, which is why I try and put in a heap of step-by-step photos!!!
One thing I do know is that I am truly hooked by this front basting method and will definitely be stitching this way from now on....thank you Liza.
Up until now I had always been a freezer paper, finger press and pin girl. I had already cut out the freezer paper for this tree and drawn around the freezer paper for the outline. I'm not sure how Liza draws her outline onto her fabric, but next time I will put the pattern over my lightbox, then place the fabric over that, then draw around the outline, thus skipping the freezer paper altogether. (Any hints Liza?)
Once the outline is drawn, pin the shape to the background fabric (I didn't need many pins to hold it in place)...

Once the shape was pinned to the background, I used my freemotion (darning) foot to stitch over the drawn line. The one thing you have to be careful about with the freemotion method is that your stitches don't become too small or they will be very hard to unpick!!!


One thing I do know is that I am truly hooked by this front basting method and will definitely be stitching this way from now on....thank you Liza.

Cathy xo
Cabbage Quilts
Subscribe to:
Posts (Atom)