In this tutorial, I'll cover the handpiecing, the way I do it anyway, perhaps others have other methods? I'm going to copy sections of Basic Quilt Making in the book " The Fabrics of Society"
which I co-authored with Annette Gero:
HAND PIECING:
The following photographs illustrate basic hand piecing. The important points to remember are: sew small stitches, back stitch every three or four stitches, check that the seam lines on both patches match and do not sew over seam lines as you would in machine sewing. In hand piecing, leave seam allowances free, trim seam allowances when the quilt is completed. Use matching thread or medium grey if there are a lot of patches in different colours. With hand piecing, it is perhaps best not to press seams as you go, the less it is handled, the less likely it is for the quilt to be stretched out of shape. I suggest press once before the quilt is basted with batting and backing fabric.
ALL PHOTOGRAPHS SHOWN BELOW ARE FOR LEFT HANDED PEOPLE, FOR RIGHT HANDED PERSONS, SEW RIGHT TO LEFT. (I’m a left hander)
Mark patches, add seam allowance and cut pieces.
Arrange the pieces.
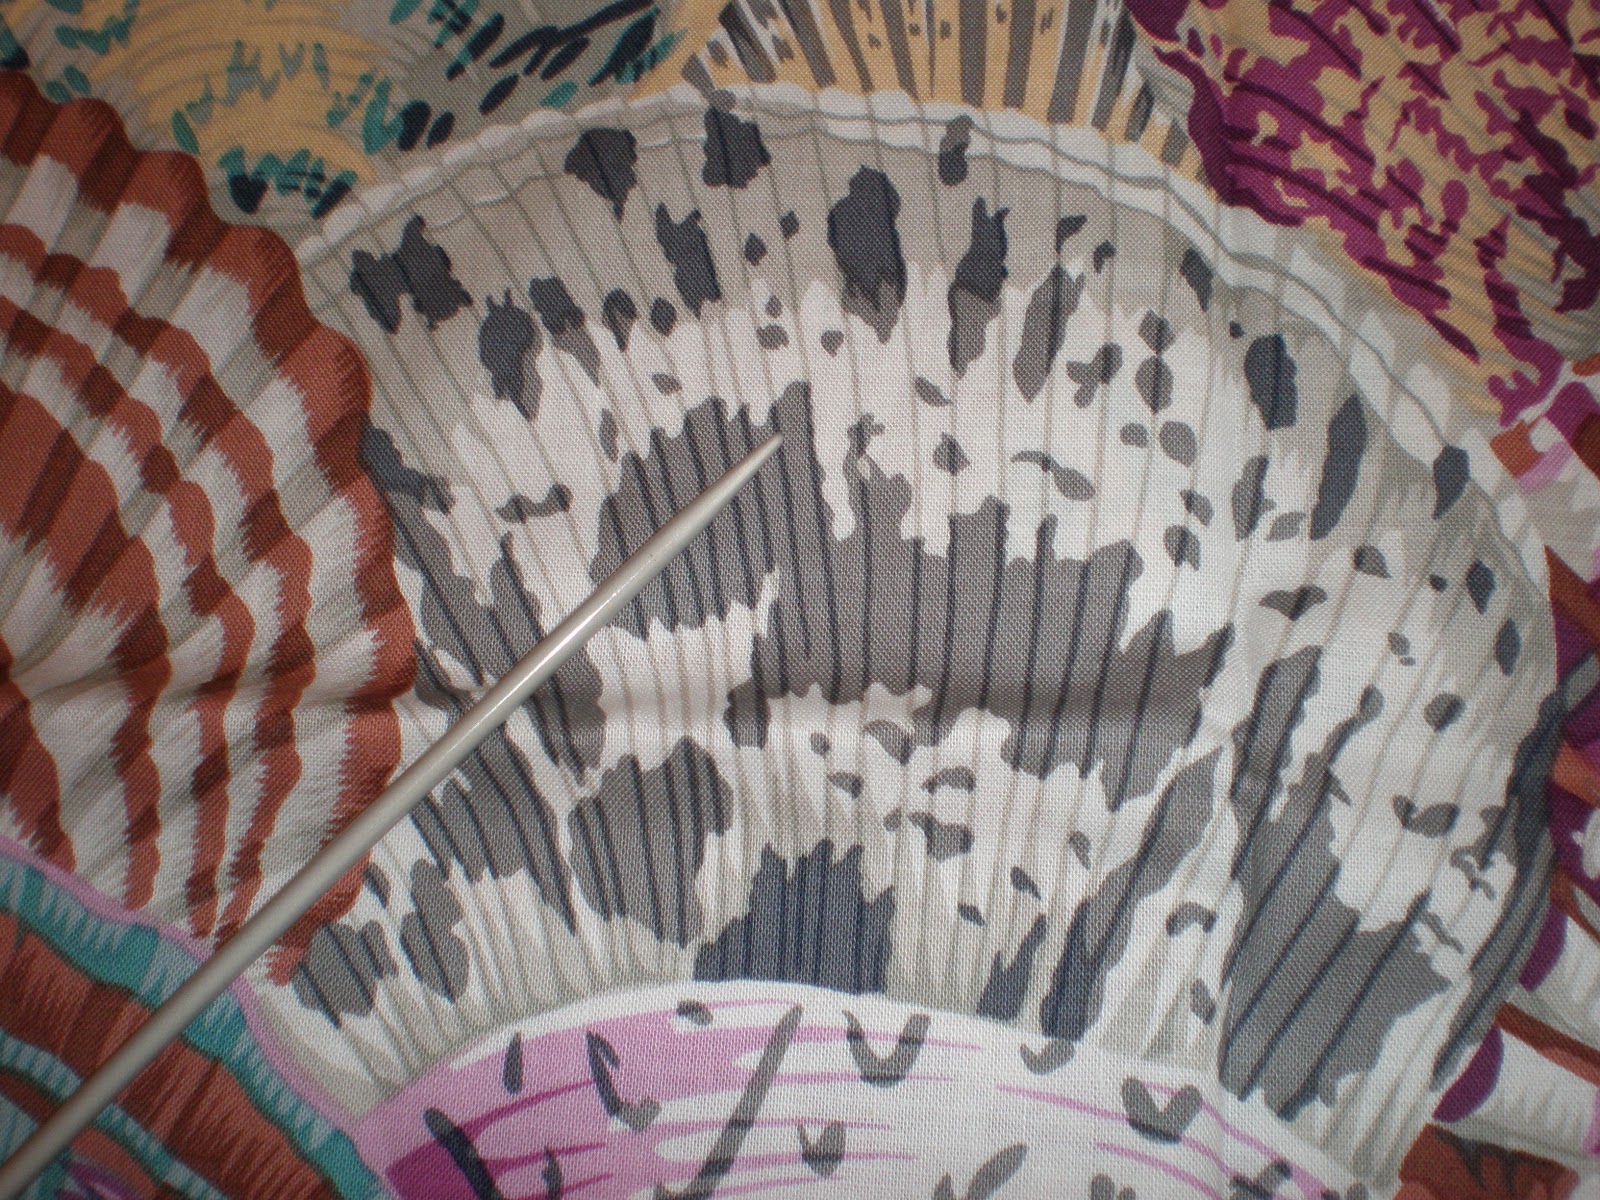
Place right sides of patches together, pin and sew. Backstitch every 3 to 4 stitches.
Look at the second patch at the back of work, check that the stitching is still on the sewing line.
Pin the patches at the intersection and at the last pinning point ( and in between if you wish)
And sew towards the intersection.
Slip the needle at the intersection, don't sew over it as you would with machine piecing.
Finish sewing to the end, double stitch to knot.
For curved piecing:
Mark patches with the template, on the concave curve, clip the seam allowance.
Pin the right sides of patches together, then sew with tiny running stitch, and backstitch every 3 to 4 stitches. Check the other side also, to make sure the stitches are on the line.
 Done!
If you are going to do lots of these Variable Stars and Pinwheels, gather your fabrics. I've used the shot cottons and prints.
For the stars, choose fabric for square D first as this is the focal fabric, then choose the star points - perhaps in a colour that is in the square D and then choose a contrast or coordinating colour in the shot cottons for the background of the star.
Done!
If you are going to do lots of these Variable Stars and Pinwheels, gather your fabrics. I've used the shot cottons and prints.
For the stars, choose fabric for square D first as this is the focal fabric, then choose the star points - perhaps in a colour that is in the square D and then choose a contrast or coordinating colour in the shot cottons for the background of the star.
For the Pinwheel, choose the print and then the shot cotton in something that will go with the print.
The Kitchen Garden:
I love this block! Those bias strips are meant to be the hedges. I've used BM "Shingles" - the green colour is probably better than the grey one I used, it's too light and used the Clover Bias Maker gadget to make the bias strips. Some stripey fabric would be great here too.
When stitching the bias strips onto the background fabric, make sure that they extend all the way to the edge of the background fabric. The last thing you need is for the hedges to be too short when you are at the stage of measuring the final block to cut off the excess seam allowance! ( I've done this, and I was not a happy camper!)
Decide on the fabrics for the garden benches aka the cats' sleeping areas. Something that read solid like the "shell scape". ( Refer to last tutorial - see up the top under the banner for a link to previous tutorials) For the cats and dog, look at the "feathers", "scallops" or "shell montage"- there are lots of furry textures there.
The vegetable plots - these are fun, choose the middle part of the vegie bits first and centre the motif of the fabric and then choose the leaves parts. The animals in the middle, choose the bigger ones first and then use the smaller ones to balance out the colours. The applique pieces here are quite small, so you can use up the scraps. I don't think there is much of a problem here, lots of colours is the general idea. It's amazing how reds and pinks lift up the other colours.
Below this block is the panel " Rooster & Hen Vine". Choose the rooster & hen first and then gather the fabrics for the leaves and berries, line them up and look at the array first before you iron the templates. I used the "ombre" for the rooster and his tail is the PJ "Miami" - this fabric is really great - I also used it in the "Disc" block. Have a look at it and see what you can find! I've used BM " rings" for the hen, this fabric line is really useful, lots of rings for circles and it is also lovely for the larger animals.
The Folly:
With this block, you'll need to decide on the roofing, choose 2 fabrics that coordinate together, I used the KF yarn dyed stripe fabric, but this particular colouring may have been discontinued.
Look up the Glorious Color site for stripes that are currently available. Really, not too worry, there are other stripes you can choose from, the BM lines have a few, or you can use something with dots like the hen fabric above, then pair it with a shot cotton, the contrast will be lovely. Then choose the fabric for the building structure, something that read solid ( see previous tutorial), I used the BM "shingle" in grey, again I think its a bit too pale, try the green one which is slightly darker. After this, choose the fabric for the dome thing up the top and the awning, the "ombre" is good for this as there are a lot of colours in each width. Next, choose the 2 trees on either side of the folly, and then decide on the pots. Something that will balance out the roofing. After this, choose the steps and the cats and dogs. For the birds on the lower section, try and choose colours that will balance the roof so you'll get an even distribution of colour density. Also do the birds above at the same time to make sure they are roughly at the same colour depth. I love the " coleous" fabric for the birds! Lastly, do the berries, use these to add more colours to the block, or to add colours that are still missing. I did some stem stitch embroidery for the hanging basket. It's not hard is it?
OK, let me know if you want me to clarify something, I'm only too happy to do so, if I know the answer that is! Hope this tutorial have been useful. We'll go and do the Horse Yard and the House next time. Have a lovely time stitching, and don't forget to post your photos! K


.jpg)